This is a part of a series on developing Gridworld Plus.
Introduction
Four years ago, in the summer of 2015, I went to a summer camp where the goal was to develop a game with the Unity game engine. Ambitious as I was at that time, I decided to create a 2D Grid-based combat game with real-time online multiplayer. After spending hours each day developing in Unity and writing C#, I created Gridworld, a minimum viable product with working functionality and nonexistant graphics. I am still surpised that I got online multiplayer working, using the questionably engineered and poorly supported UNet library that was built-into Unity.
Today, in an effort to learn the Godot game engine, I’ve decided to implement a “new and improved” version of Gridworld, named Gridworld Plus. When I first created Gridworld, Godot engine was in its infancy, having just released in the beginning of 2014. Nowadays, Godot has a strong development community, even though, from what I can tell, nothing super mainstream has been developed in Godot, probably due to other ecosystems such as Unity or Unreal being far more mature, and also because many other game engines are developed for the purpose of making a specific game.
One advantage of Godot is that it’s fully open source, so I decided that if I were making games in open source, I might as well try out an open source engine. Also, Godot uses its own scripting language, GDScript, for coding games. Normally, I would be against using a custom programming language, but GDScript is a language similar to Python and appears to be specifically designed to be used with the Godot engine, so presumably the extra effort needed to learn the language translates to added value when using the language in conjunction with the engine.
What is Gridworld Plus?
Gridworld Plus is a 2D Grid-based combat game, where the objective is to defeat enemies and survive. You control a player who moves around a map, using skills to fight enemies. Movement and skills require a resource called Action, which prevents you from performing more actions until it is empty again. When your Action is empty, it’s your turn, and the world pauses and waits for you to perform your action before resuming. As this game is under development, specific details as to how it works will be fleshed out as time goes on. Without further ado, let’s get into making the game!
Making the world
The first step to making the Gridworld game is to make a basic world to play the game on. Using some assets I got from Humble Bundle a while back, I made a Tile scene, which displays a tile given the name of the tile.

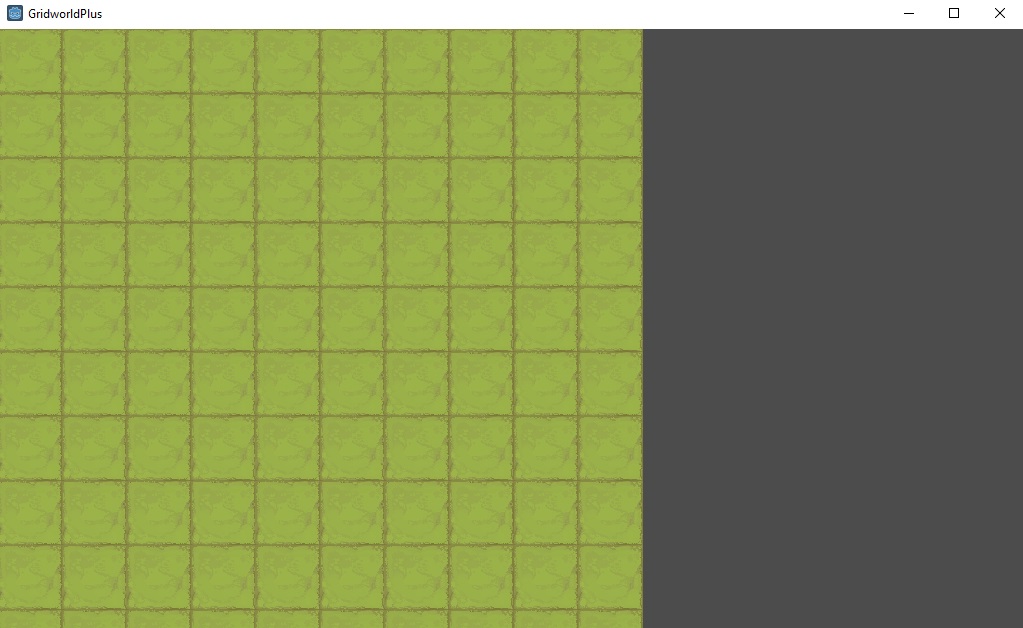
Next, I made a World scene to display the world as a collection of Tile nodes. I wrote some code that created a 10-by-10 battleground of tiles:
export (PackedScene) var Tile

var tileWidth
var tileHeight

func _ready():
	# Assume all tiles have same width/height
	var defaultTile = Tile.instance()
	tileWidth = defaultTile.get_width()
	tileHeight = defaultTile.get_height()
	# Setup tiles
	for x in range(10):
		for y in range(10):
			var tile = Tile.instance()
			tile.position = get_tile_position(x, y)
			add_child(tile)

func get_tile_position(x, y):
	return Vector2(tileWidth * (x + 0.5), tileHeight * (y + 0.5))
At this point, we have a world!
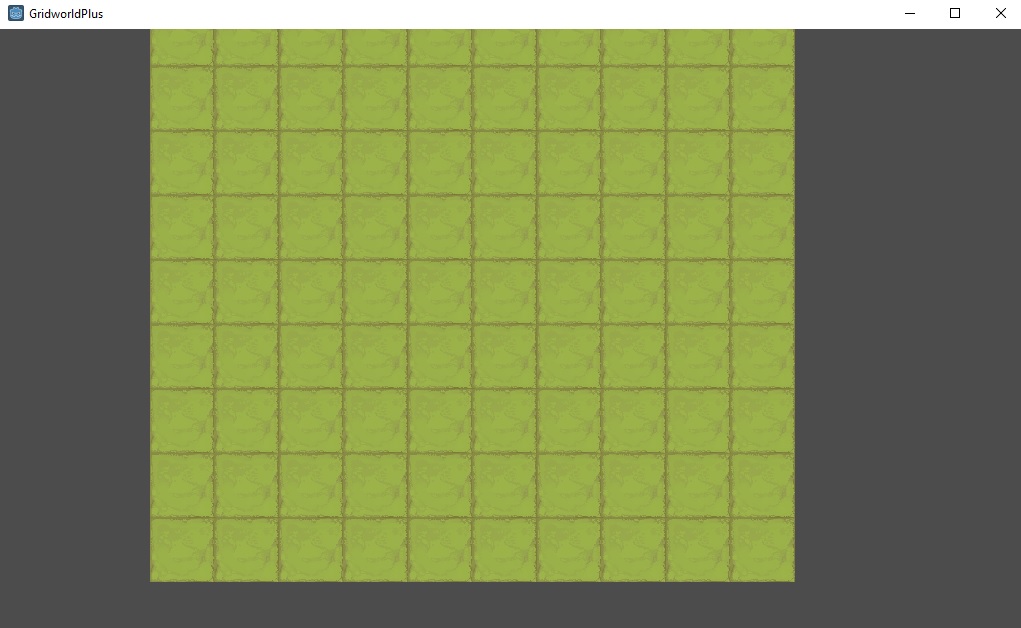
Adding a camera
One issue we can see right away is that a part of the world is cut off. Because I want to make sure that my world is generated correctly, and to provide functionality to support larger worlds, I added a Camera2D subnode to the World node, set the camera to “Current”, and added the following code to control the camera movement with the arrow keys:
const cameraSpeed = 1000

func _process(delta):
	if Input.is_action_pressed("ui_left"):
		$Camera2D.position -= Vector2(cameraSpeed,0) * delta
	if Input.is_action_pressed("ui_right"):
		$Camera2D.position += Vector2(cameraSpeed,0) * delta
	if Input.is_action_pressed("ui_up"):
		$Camera2D.position -= Vector2(0,cameraSpeed) * delta
	if Input.is_action_pressed("ui_down"):
		$Camera2D.position += Vector2(0,cameraSpeed) * delta
One issue that I had when adding camera movement was that Godot has this default functionality called “camera drag” which adds a delay to camera movement. After removing camera drag, the movement worked as expected. Now we can move around the stage:
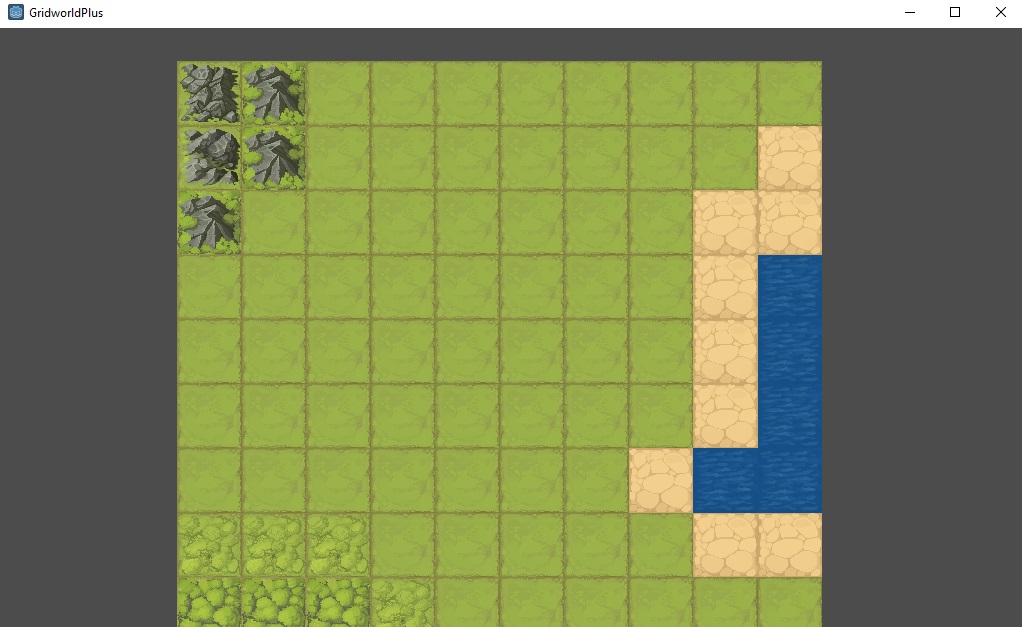
Multiple types of tiles
The next step is to make the world generation slightly more varied, by providing a 2D array of the type of tile to generate for each tile, rather than generating uniformly grass tiles. The world generation code was updated to refer to a tile map array:
const map = [
	["h3", "h1", "g1", "g1", "g1", "g1", "g1", "g1", "g1", "g1"],
	["h2", "h1", "g1", "g1", "g1", "g1", "g1", "g1", "g1", "d1"],
	["h1", "g1", "g1", "g1", "g1", "g1", "g1", "g1", "d1", "d1"],
	["g1", "g1", "g1", "g1", "g1", "g1", "g1", "g1", "d1", "w2"],
	["g1", "g1", "g1", "g1", "g1", "g1", "g1", "g1", "d1", "w2"],
	["g1", "g1", "g1", "g1", "g1", "g1", "g1", "g1", "d1", "w2"],
	["g1", "g1", "g1", "g1", "g1", "g1", "g1", "d1", "w2", "w2"],
	["f1", "f1", "f1", "g1", "g1", "g1", "g1", "g1", "d1", "d1"],
	["f2", "f2", "f2", "f1", "g1", "g1", "g1", "g1", "g1", "g1"],
	["f2", "f2", "f2", "f2", "f1", "g1", "g1", "g1", "g1", "g1"]
]

# Called when the node enters the scene tree for the first time.
func _ready():
	# Assume all tiles have same width/height
	var defaultTile = Tile.instance()
	tileWidth = defaultTile.get_width()
	tileHeight = defaultTile.get_height()
	# Setup tiles
	for y in range(len(map)):
		for x in range(len(map[y])):
			var tile = Tile.instance()
			tile.position = get_tile_position(x, y)
			# Set the tile's displayed image according to the map
			tile.set_tile(map[y][x])
			add_child(tile)
Each two-letter tile name corresponds to an abbreviation describing what the tile is. For example, g1 refers to “grass 1” and w2 refers to “water 2”. This way, we generate a slightly more interesting world to play in. In addition, we can support multiple stages by simply storing the stage information in a 2D array and loading it in when needed.
Next steps
The next step in developing this game is to create a player character to move around in and interact with the world. After the player is added, there needs to be some notion of enemies and skills, before the game becomes (barely) playable.
This is a part of a series on developing Gridworld Plus. Continue reading at part 2 - adding the player.